Tuesday, April 6, 2010

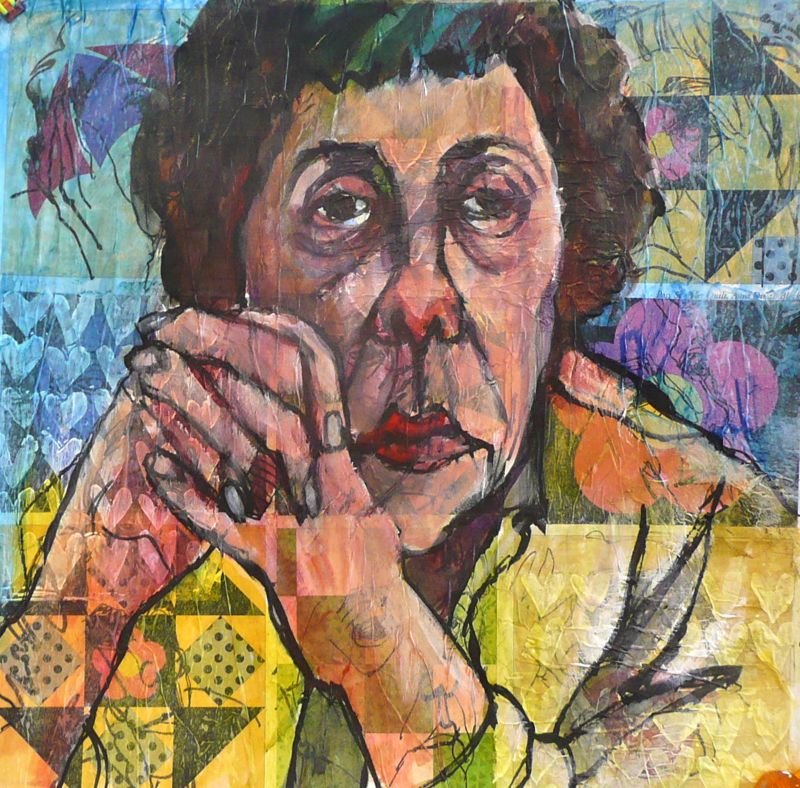
DEMO DISASTER!

This was as far as I was able to complete the painting for the demo last night.  I think the stress of being videoed and having less than an hour to work, got to me.  I was able to share some new materials and some different ways of working on the Tyvek paper, but overall, I was not very happy with this painting.         Still, it was fun meeting everyone and sharing my enthusiasm for art.  Everyone was complimentary and said they enjoyed the evening.  I appreciated their warm hospitality.

Sunday, April 4, 2010

THE START

I was pleased with many of the outcomes of the last painting and have been thinking about the next variation.  Each painting needs to explore something different but keep to the self imposed requirements of combining collage, quilt or grid, drawing and self portraiture.  I decided to use the phone book as my collage material.  I found enough pages with some color variation and pattern to keep it interesting but not overpowering.  I kept the size of the drawings the same size as last time,  I am using the same drawing instrument for all the drawings. I took one of those cheap pull apart wooden chopsticks and whittled the wider end as thin as I could manage with a small box cutter blade.  I then shaped the more pointed end into an interesting shape for drawing fine lines.   I managed to get six of the drawings done today.  So far, I like the effect.  

I will be doing a demo for the San Carlos Art Club tonight.  Everything gets underway at 7 PM   They meet at the San Carlos Adult Community Center, 601 Chestnut Street (corner of San Carlos Avenue).  Parking is available under the library - 1/2 block away.  I'm sure visitors are welcome.  I hope some on you will be able to stop by.

Wednesday, March 31, 2010

IT'S DONE...NO FOOLING!

My critique group acts as my expert eyes.  Often, they see something I missed.  Sometimes their opinions are different from mine and I am not swayed.  Either way, I find it very helpful to know what others see and I value the knowledge at expertise from each of them.  Thursday morning we gather to share the week's efforts.  Right now, I feel this piece is finished.  I am happy I managed to keep much of the transparency of the background pieces.  I was particularly delighted where some of the pattern fell on the face in a serendipitous way (beside the eye and crease down from the nostril)


A WORK IN PROGRESS!

Here is the painting on my easel.  These insulation boards used instead of gatorboard to support the painting are great.  Not only are they cheap, lightweight and easy to cut to whatever size you want, you can also pin into them.  I have some long pins with beaded heads left over from my sewing days.  I unpinned the bottom so the edges are curling in this photo.  

I took a large sheet of tracing paper and placed it over the background and drew my image on.  I surprised myself and got it almost right the first try!  I am getting better at judging space and distance working this large.  All that practice I have been getting.  I made a few small corrections then transferred the image and went over it with ink drawn with my favorite coffee stirrer stick.  I used some white gesso in the highlighted areas.  Now I am building up the color with very diluted fluid acrylic.  I should be able to finish in with an hour or two more painting.

I want to thank those of you who took the time to comment on my last post.  In response, I want to share my thoughts with you.  I put aside the very best drawings without a plan for their future at this time.  The rest I decided to not see them as too precious. I want to focus on the "doing" more than the results.  If I produce enough work, some of it will turn out special, lots will be "okay" and some will be suited to the trash heap.  But all will have engaged my artistic muscle and fulfilled my desire to explore, express and make something with my heart and hand.  For me, that is where the fulfillment is.  I have photographed each drawing as I created them and plan to make a book at the end of the year long project as a way of documenting it.  I also had purchased a second calendar.  I have used a few of these pages when a drawing went particularly bad!  I feel I don't need to keep 365 drawings in tact and I am having fun finding new ways to incorporate them into larger pieces.  I used drawings I was unhappy with for my practice piece, so I was not concerned how that one might turn out.  If anyone has suggestions for other uses for these drawings, please send me a note.

Saturday, March 27, 2010

PUTTING IT ALL TOGETHER!

I realized I had enough of these daily drawings (see "Drawn to the Mirror" blog) to make a background for my next collage self portrait series.  I cut off the calendar information and laid them out, trying to keep the stronger patterns to the outside edges.  I used double stick removable tape to hold them in place.  It makes an interesting image just this way.

 I started to get nervous about proceeding with my idea.  How would it look?  I would hate to ruin all these drawings if my concept turned out "not so much"!  I am usually impatient and rush ahead, but today I decided to try a smaller version (15 x 15) to see the visual effect before I tackled the large (30" x 30") version.  Glad I did!  First off, I realized I needed to spray the papers with acrylic to keep some of the ink from smearing.  Not all of the drawings were done with permanent ink.  I had forgotten that little detail!

I added tissue paper over the top after collaging the drawings down.  I purposely added a some gesso stamped tissue in a few places to see what the effect would be.  It obscures the drawing too much.  I will leave that out of the large version.

 After the collage paper was dry, I drew an image in ink with a stick.  I didn't think the line was strong enough against the background, so I went over it with the wide Copic marker.

 I finished the painting with acrylic used in a transparent way.  I added some white gesso to recapture some lighter values.  These areas become more opaque but you can still see some of the background influences.

  Final evaluation:  Like the overall idea. I need to be a little more careful in my drawing so it doesn't get so "cartoon" like.  I find the heavy dark line a bit too strong.  I think I can tackle the larger painting with confidence now that I have worked out my strategy.

Wednesday, March 24, 2010

MORE EXPLORATION WITH AMERICAN JOURNEY WATERCOLOR STICKS!

I spent some time today playing with my new Cheap Joe's American Journey Watercolor Sticks.  I tried different watercolor papers.  This is a quick painting I did in a travel sketch book,  The paper is smooth, heavy but not 100% rag.  In fact,  it is an American Journey spiral bound watercolor travel journal.  I drew in the basic shapes with ink, let it dry and then worked with the sticks.  They are different from Caran d'arche  watercolor crayons.  Watercolor sticks are pure watercolor with enough binder to hold them together.  Joe's don't seem as "sticky" when wet as do Daniel's but the quality of the paint in the American Journey line is not that of Daniel Smith.

I discovered that there is a significant coating of clear wax on the American Journey sticks.  I had bought a sharpener from Daniel Smith that takes a very large diameter stick and this peeled off the wax nicely without loosing too much of the pure pigment.  I suppose a sand paper block would work to remove the wax or an exacto knife, etc.  Once that barrier was removed, I used a wet brush to pick up pigment and apply to the paper.  I also dipped the stick into water and "colored" with it, then smoothed it out with a damp brush.  The nicest feature of the stick is it's shape....it has a pointed end like a crayon.  Daniel Smith watercolor sticks are flat at both ends.  They have no protective coating to remove before you can use them.

Overall, I think these American Journey watercolor sticks will be great for travel sketching.  They work best, for me, on smooth paper.  I don't think I would attempt a serious painting with them. 

If you think you might be interested in this type of product, my suggestion is to order a red, yellow and a blue and then play around .  Everyone has a different style of working, so what works for you may be very different than what works for me.  If you come up with some interesting techniques with these sticks, be sure and drop me a note and share your discoveries.  

Tuesday, March 23, 2010

CHEAP JOE'S NEW WATERCOLOR STICKS TRY OUT!

My order for the compete set of Watercolor Sticks from Cheap Joe's has been on backorder for about 6 months!  They finally arrived today along with an order from Daniel Smith for these plastic cases to store them in.  They get sticky and messy when wet.  These cases are a great solution and solve the problem nicely.    I have about 8 colors from Daniel Smith's watercolor sticks.  I was excited to try them out today and compare the two lines.  Daniel Smith's sticks are very pricey....$12 each!  Cheap Joe's were about $4 each, at least when you bought them as a set.  This particular painting had my gesso transfer over an old painting.  This is a very rough surface to paint on but produces great texture.  DON'T USE GOOD BRUSHES as they will wear away quickly.  I drew with ink using a new stick I found at Michael's.  I bought an entire package (should last awhile!) and they look sort of like fat, flat, large toothpicks.  After the ink dried, I wet the watercolor stick by dipping it into water and started using it like a crayon, then took a wet brush and blended out the color.  I need to try the Cheap Joe's sticks on a more traditional watercolor surface before coming to any permanent conclusion, but the new sticks seem to have a serious wax coating on them and do not have the richness of color I find in the Daniel Smith brand.  This may be a case of "you get what you pay for"  

Related Posts with Thumbnails