Tuesday, January 31, 2012

MY FIRST E-BOOK!


To view this book easily, click on the full screen icon!

I had started this book in December and then life took
 over.  I finally finished it at 2 AM a few days ago.  I
 was so close, I just kept going.  I decided to create a book each year of all the art work I had produced.  This way I have an excellent record that will last a long time. I got a little carried away, so this book has 117 pages!  Lots of my sketches.  I ordered a hard bound edition so it would hold up well.  A little pricey but worth it to me.
The best part is they can produce a downloadable version for a very affordable price!  On my iPad, or other electronic device, one can enlarge the image to really see all the details.  

You might want to consider doing this kind of archiving of your work, too!  I always photograph each piece after it is finished.  Often, I will photograph the steps as I work. This is a valuable tool to remember complicated processes. Once that stage is covered up, it is gone forever.


Sunday, January 29, 2012

THIRD TIME'S THE CHARM!


I started putting color on yesterdays start. OMG! Get out the gesso and collage papers, what a disaster!  One thing that experience teaches is when to cut your losses, and start again.  Actually, I had made some major mistakes in the scale of each head, so even if the technique had worked out, the drawing was flawed.  Anyway, I decided to go with Tyvek this time and was able to complete the painting from drawing to last glaze in 4 or 5 hours.  I took a break in between to let it dry.  Now that I am looking at it on the computer, I see a few adjustments I would like to make.  Overall, I am pleased with this one. It is a good likeness of three out of the four heads.  2 down, 18 to go!

Saturday, January 28, 2012

A LITTLE REVISION!

THE CLAN #2 FINISHED!
I kept thinking the painting needed some gold but I was challenged to incorporate the gold without making it the dominant element.  My critic group had a few suggestions.  I took a few to heart and added my own idea.  The thing about applying gold to the surface is it's like jumping off a cliff .  There is no going back!  I gave the painting another coat of red unifying the background better and even covering the black calligraphy.  Then I applied gold gesso (Daniel Smith brand) over the old black calligraphy.  Then I mixed black gesso to a brushable consistency and went over the gold letting part peek out.  Lastly I added the Chinese symbol for "love" with just gold gesso.  I have a stencil of this character but I just used it for reference and wrote the word by hand.  

Today I started the next painting in this series.  It is based on the technique in the Creative Catalyst DVD by Anne Bagby where she does a detailed pencil drawing, sprays it, then glazes over with unusual colors, adds white to bring the values back then finishes painting it.  I have the white "grisaille" done.  Tomorrow I will finish it up.  Look for the post with all the steps tomorrow night!

Wednesday, January 25, 2012

HAPPY CHINESE NEW YEAR!

THE CLAN #2 STAGE 1

THE CLAN #2 STAGE 2

THE CLAN #2 STAGE 3

This is the start of my new series.  I am calling it "The Clan" because the faces belong to my husband and three sons.  I am going to number this painting "2" because I like the first painting to be a fairly representational example from my source material.  I will start on that one tomorrow.  In the meantime, I had this idea in my head and wanted to get it going.  

This is a very exciting part of the country to live in when Chinese New Year is being celebrated.  We have the good fortune to have one of the most authentic Chinese restaurants in the entire Bay Area right in our little town.  The food is wonderful and they treat us with love and share their culture with us.  Monday was the beginning of the Year of the Dragon!  So, this is my version of a Chinese painting.  I went to the restaurant and picked up some free newspapers to collage into the background.  I was disappointed that there were no dragon images but lots of great calligraphy.  Red is for good luck and prosperity.  I put two coats of gloss medium over the painted collage for a lacquered effect.  When all was dry, I took my large chinese brush loaded with ink and attempted to draw the faces in a calligraphic style.  I wanted them to reference Chinese language characters.  I took a course in Chinese Brush Painting in college, so I know the general idea of manipulating the brush.  Like many of my ideas, it looked better in my "mind's eye" but it was fun to do.
.

Tuesday, January 24, 2012

DRAWING WITH A COFFEE STIRRER STICK!


I received a comment today on this little video that I did awhile ago.  The music is by Tom Rigney, called "The House of the Setting Sun" (I think!)  I often like to take my walk while listening to this album.  It gets me moving.  His group is called Flambeau and is Zydeco music but it also reminds me of Klezmer music.

I am starting a 10 week, 20 painting series and have been doing some preliminary drawings.  I have the first two paintings planned out in my head.  They will be done before Monday.  One of them will have Chinese brush drawing in it.  It has been a long time since I have practiced that particular skill.  I have a Buddha Board to practice on.  You make a brush stroke with just water on the brush and it darkens the paper where touched.  The mark slowly dries and fades away.  This is a great way for me to practice without going through loads of ink and paper.  I should have something to post by tomorrow night.

Thursday, January 19, 2012

THIS FROM THAT! DAY 4 BROMMER WORKSHOP

G.  BROMMER 5TH PAINTING ABSTRACT
This painting is heavily textured and very 3 D!  No special glasses required for viewing.  I decided I wanted to create an abstract where the focus was the texture.  Abstracts are not my strong suit so I opted for the easy cruciform composition.  This has lots of layers built up and some interesting additions like part of a chopped up credit card, an electronic's unit from some small item I found and foam letters.  I even stuck in the paper peel off backs from the letters.  I started out tearing up some life drawing rejects that were drawn on newsprint.  I remembered to photograph the start before the gesso was added but failed to photograph the gesso covered painting.  Below is the beginning stage.  Tomorrow we will have a critic after lunch and then pack up, so I will probably just get a start going.  The week has flown by, as always happen during an intense workshop experience.

G. BROMMER #5 PAINTING STAGE 1

Wednesday, January 18, 2012

BROMMER WORKSHOP: DAY 3

GERALD BROMMER WORKSHOP PAINTING #4
I started the day off with preparing a new surface.  I forgot to photograph it before the gesso was applied but it wasn't too much different.  I used an interesting heavy embossed paper along with some torn Tyvek (You need to make a small cut in one side to be able to pull the Tyvek apart) and some foil that I had embossed with a textured plate.  The board I was working on was bigger than the finished image I was after so I didn't bother to cover all the space with collage.  I brushed GAC 200 over the foil so it would accept paint (GAC comes in different numbers and each one is designed to do a different job.  GAC 200 is for non-porous surfaces such as foil, glass, etc.  You can brush it on the surface before painting or mix it into the paint.  It dries clear.  This is a Golden Acrylic product available at major art suppliers both local and online.)  I partially covered the heavy embossed paper with gesso.

GERALD BROMMER PAINTING #4 FINISHED
Here is the finished painting, cropped as I had envisioned it.  It is difficult to photograph foil but the embossing shows up in an intriguing way.  I used carbon ink on top of this collage and like the richness of textured surfaces with just value and no color.

GERALD BROMMER PAINTING #3
This is how this painting looked yesterday when I left for the day.  I thought it was ready for the "dog pile" but someone suggested I not give up on it when they commented on yesterdays post.  I decided to give it one more layer and see if I could bring it around.  When you start doing heavy duty collage, everything in your path becomes a valuable addition to your "stash".  I was taking a walk last week and passed this tree (I think it was a Bottle Brush Tree) and there was a strip of bark hanging off the tree.  I couldn't resist and ripped it off and took it home and added it to the ever growing pile of things to take to the workshop.  So, since this was supposed to be part of a tree, I thought it might be interesting to see  if I could collage some of the bark onto the paper.  It took a little determination but it saved the day!

GERALD BROMMER PAINTING #3 WITH ADDED BARK
I covered the bark with tissue collage and when it dried added some color.  After much contemplation, I decided it should be cropped and matted to create a stronger image and a temperature dominance.  This is the final version and a detail so you can get an idea of the texture up close.

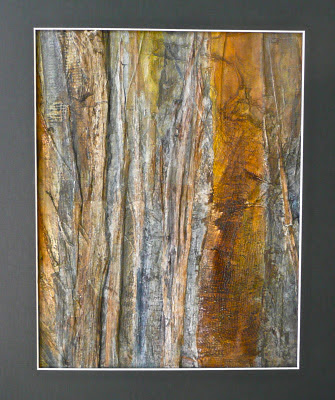
GERALD BROMMER PAINTING #3 FINISHED AND CROPPED

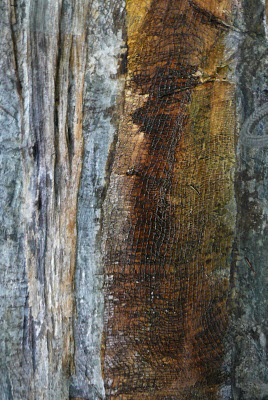
GERALD BROMMER #3 PAINTING DETAIL


Related Posts with Thumbnails