Showing posts with label collage. Show all posts

Friday, March 25, 2011

NEXT IDEA!


The last painting was more detailed than I really wanted, so I thought for awhile about a new approach.  With the help of Photoshop Elements, I created a "notan" 2 value pattern.  Using a failed painting, I drew the shapes of the light pattern on with a brush and gesso.  Then I brushed a dark value of Dr. Martin's Hydrus over what was left.  When that layer dried, I collaged some stamped collage paper over part of the painting, then covered the entire page with plain white tissue.  So far I like the effect.  I going to go slowly so I don't get too fussy.

Thursday, March 24, 2011

WITH A LITTLE HELP FROM MY FRIENDS!

I have been procrastinating finishing this painting because I was "stuck"  It wasn't coming together in a way I was happy with but I couldn't figure out how to make it work.  Things got so bad, I started cleaning house.  My husband asked if we were expecting company.  As it turned out, our grandson was on his way which was extra motivation to clean.  I took the painting to my critique group this morning and their expert eyes gave me the information I needed. This was the extra motivation to paint!  I was able to come home and finish it up.  It feels good to be able to move on to the next one.  

I hope all of you have a critique group to attend.  I love seeing what others are doing and learn so much from everyone's comments about each painting that is presented.  I also find it extremely helpful to hear what others see in my paintings.  Because I know the intent behind each of my paintings, I don't always see what they see.  I think I get eye fatigue, as well, where I don't notice every detail after looking at something for an extended period.  I get by with a little help from my friends and I cherish them.

Sunday, March 6, 2011

NO GRASS GROWING UNDER MY FEET!

I am working on my Kanuga presentation.  I am thinking I will collage a drawing onto the altered surface and then paint from there.  I am trying different variations of this idea.  This drawing was done on some sort of Japanese paper I have.  The drawing was done with a coffee stirer and ink.  I really liked the results.  The surface of this paper is very soft  and is difficult to collage down because it starts to fuzz up a bit.  I put it over a surface that I had used ink and bleach on.  The bleach causes the ink to turn brown and yellowish. It continues to bleed through with interesting results.  I like this piece the way it is and don't think I want to add color to it.
This piece is tissue paper with a sharpie ink drawing on top collaged onto a piece that had very colorful, high gloss collage on it.  I love the random color that shows through the tissue.  I will definitely paint on top of this page.

This page had a red ink drawing on tissue collaged over a collaged background.  I am leaning toward this idea but need to see how the red line works into the painting.  
This was an experiment to see how a drawing on newsprint would work as collage material.  I was surprised to see it allows the background to subtly show through and works well as collage material.  I added the magenta ink while it the sheet was still wet so it bled.  I'm not sure I like that result but I can add paint on top and modify the effect.  

I need to finalize my ideas so I can stop stressing over this demo.

Monday, February 21, 2011

A EUREKA MOMENT!

I think this is done.  I was able to increase the saturation of color.  It just took some layering.  I am getting pretty tight with these paintings.  I will probably proceed along these lines for awhile and then get more gestural when I have the literal out of my system.  

So, what was the Eureka! moment?  I often lie in bed and imagine how different ideas will look and then fall asleep.  Often, the in the first waking moments, ideas pop into my head.  The subconscious works on the problems and comes up with solutions.  I have been trying to resolve a composition of multiple heads and hands, what size paper, what shape paper, etc.  I like to just start drawing because of the spontaneity of the line and image but it is hard to control the composition when I work this way.  It came to me that I could draw the images on tissue paper and then move them around until I found the most appealing composition and then collage them onto the paper.  I am very excited about this idea.  I want to use a color other than black, and using a stick with ink will probably be too rough on delicate tissue paper, so I think my Lizard's Lick #4 dipped in acrylic ink will do the trick.  I'm looking forward to trying this idea out this afternoon.  Stay tuned.........

Sunday, February 20, 2011

ONCE AGAIN, WITH A SMALL DIFFERENCE!


I started a second painting today, having prepared the surface a few days ago.  This surface is just gesso over an old painting and some torn  tyvek collaged on top.  There is no tissue and no pattern either on the tissue or stamped into wet gesso.  I thought I would photograph this one as I went along.  I started out drawing with my stick dipped into red acrylic ink.  As you can see, even though it is acrylic it is possible to make some adjustments and rub out unwanted lines.  I am using mostly acrylic ink for the paint on this one and I am finding that intense acrylic color fades quite a bit when applied to the tyvek surface.  If you look under the neck of the background figure you can see the difference between the gesso surface and the tyvek as that dark passage was painted at the same time.  This painting needs a little more work and then I am ready to try a new combination of techniques.

Saturday, February 19, 2011

EVELYN'S FRIENDS...first painting !

This is the first painting of the images I am playing with.  I am exploring different surfaces.  This one is gesso, tyvek, collage tissue and some "dirty glaze"  here and there.  I started with liquid watercolor because I could lift out paint easily.   But eventually I switched to acrylic ink because I didn't want anymore lifting.  I think I am on to something.  On to number two!

Friday, February 18, 2011

REPURPOSED!


I spent the day on Tuesday covering over bad paintings with different collage material. I took them with me to the life drawing session Tuesday night.  I waited for the 20 minute poses and this was the result.  I am happy with a few of them.  Some I like the paper better before I put the image on top!   One I may work on a little longer to see if I can salvage it.  I guess I can keep covering over until I wind up with something I like or, as Gerald Brommer says, "the paper is too heavy to pick up!"

Last night I went to a different drawing session with clothed models.  They were not professional models but did a good job and the variety was nice.  You can check out the results on my life drawing blog "Drawn from limb to limb".

Today I tried a few different ideas for collage.  I hope to paint on top of these sheets tomorrow.

Thursday, January 27, 2011

PORTLAND DEMOS DAY 3: LINE!!! AND A SLIDE SHOW!!!!!


As luck would have it, my draw paired TEXTURE as a secondary element with LINE as the primary element.  These just happen to be my two favorite elements.  Here are my demos for the day.

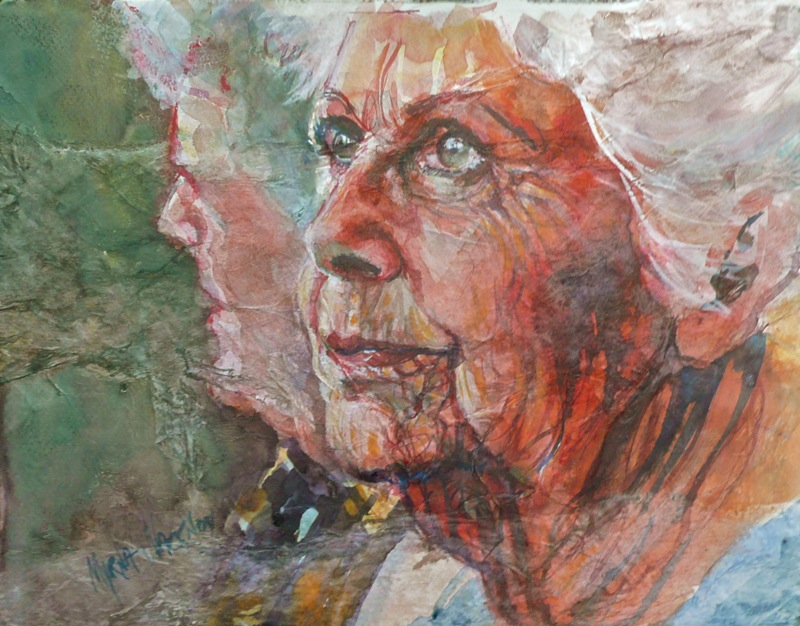
The first painting is done on YUPO.  I used watercolor crayons, watercolor sticks and Dr. Martin Hydrus liquid water color straight from the dropper full strength.  Then I spritzed and sprayed with water and alcohol.  I am very pleased with the results.  I will work with this idea again!

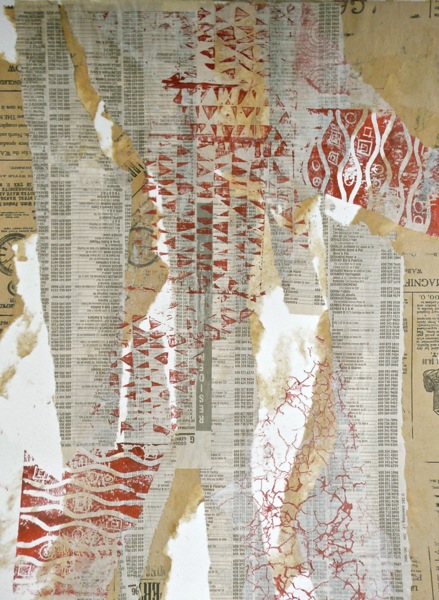
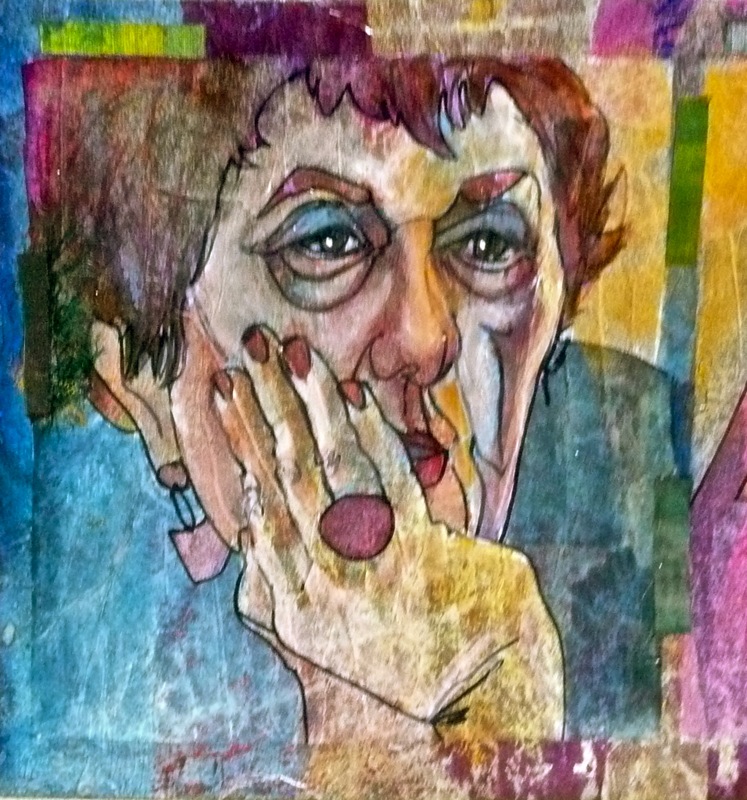
The second painting was drawn on top of  an old painting that had been collaged with different hand painted tissue papers.  I used a Daniel Smith watercolor stick, a Stabilo watercolor crayon and acrylic inks.   I will be developing this combination of materials more in the coming months.

The class did some exciting work today.  Everyone is very engaged in the process.  I love when everyone gets into the spirit of experimenting and trying new things.  Sometimes what doesn't turn out is the best lesson.

I finally found a new place to create a slide show.  Thank you, Photobucket!!!!  Here are the paintings from day two dealing with shape and texture.


Wednesday, October 27, 2010

BACK TO WORK!


 I am still putting things away after my return from LaCrosse.  The studio is finally looking like I can work out there again.  After a little editing, I will show another slide show from the workshop.  In the meantime, I came across some drawings I had done on tissue paper and a sheet of watercolor paper that ad a layer of colorful collage covering a failed painting.  I decided to collage the drawings on top of the paper leaving a nice colorful border around each one.  I managed to get three of the six images completed.  It felt good to paint again.  I hope to complete the painting tomorrow.


Wednesday, October 20, 2010

LA CROSSE DAY 3 DEMO: LINE

I have been admiring Norman Laliberte's work lately.  This is my tribute to him.  Torn black paper silhouette and white and black ink with some matalic paper collage.  Everyone is really in the spirit of the workshop and all are having fun.  

Saturday, August 7, 2010

BROMMER WORKSHOP DAY 5 : FRAMED!

Day 5 is almost always shorter than the rest of the days.  We were only going to create one painting.  The last design format he talked about was "Shapes within Shapes".  Basically, the idea is to put a border or frame like structure around the painting which serves to contain and organize what is inside.  Often if the painting is busy and feels chaotic, this device makes it work.  The border doesn't have to be continuous.  Sometimes it is more implied.  He showed lots of different examples.  Here is my version and the sample painting  Jerry painted while we worked.  Everyone was very intense in working during this workshop.  Often we kept working through part of the lunch break because and there was very little talking.  We were really "into it!

Jerry spent more time lecturing in the morning than usual, and since he had just juried the awards for the International Society of Acrylic Painters, he talked about the jurying process and some insights about how he selects the winners.  He said the awards reflect only how the juror feels at that moment.  If he juried the show a day later he might pick differently.  Ultimately, he looks for paintings he would like to take home, the ones that touch him in someway, the ones with "content".  It's not just about technique and design. Ultimately, he feels the purpose and value of these shows is to inform, educate and inspire those who come to see it. The awards are not that significant because they are just how one person feels at one moment in time.  At the end of the day, many of us went over to see the show.  The variety of paintings was impressive.  It was fun to look at the different works and "see" the design construct.  Most of my favorites received awards.  Congratulations to all of the entrants.  You are all winners.

A big thank you to Barbara Leites for all her hard work putting on an excellent workshop.

Friday, August 6, 2010

BROMMER WORKSHOP DAY 4: 8 MORE DESIGN STRATEGIES!

Day four of the workshop focused on quite a few more design strategies.  He discussed 8 additional compositional ideas.  After talking about the concept behind the design, he would show us lots of examples using this format.  There was always a wide range of subject matter and styles which was very helpful to understand how one might use this design for their own work.  Some of the examples were rather subtle and Gerald had marked those with black lines to help us see the division of space.  We were expected to produce two paintings and had the option of picking which design schemes we wanted from those that were discussed.

  Since I am not usually an abstract painter, my first choice was the Opposing Forces composition.  I can invision working this into my paintings more than some of he others.  A real challenge for me is to see how I might utilitze each design idea within my work.  I plan to play around with this idea in my sketch book when I get some breathing room. As you will see in the slide show, this was a very popular format.  I was pleased with the final piece.  I discovered some new textural techniques along the way.  I was working over old paintings.  I like how the original color shows up in very subtle ways.  For my second painting, I decided to do a vertical composition because I noticed that I have a tendency to apply collage papers in a vertical manner.  I was working on varying the width, color, and breaking up the space in an interesting way.  Not so sure about the outcome but I sure was having fun.  Here are the results of the rest of the class having so much fun it should be illegal!


Thursday, August 5, 2010

BROMMER CHANNELS DIEBENKORN: WORKSHOP DAY 3

Different compositional strategies are about ways of creating movement in the painting to lead the eye to the focal point.  Day 3 was working with a design concept associated with many of Robert Deibenkorn's painting.  This is a composition that only works well horizontally.  There is a very large space(described as expanded or feeling like it wants to expand) either top or bottom, a band across the opposite end of the painting, for containment and a narrow area (compressed between the two ) which becomes the focal point. I call this design construct "compression".  This is a great design for paintings that feature lots of sky and a very low horizon line if the expansive shape is on the top. I was able to do three, the first being my favorite.  There were many handsome pieces created with this format in the class.  We were working on300 lb watercolor paper cut 11" x 11".   Check out the slide show and find your favorite!

Related Posts with Thumbnails