Showing posts with label Mixed Media. Show all posts

Wednesday, April 14, 2010

FIRST PIECE FINISHED!

I rephotographed the finished painting and this is as good an adjustment as I can get.  It actually is a much more muted painting.  It was lots of fun to create.  Today I managed to insert the box into the gallery frame canvas.  For a first try it came out very well.  I LOVE this technique.  Can't wait to go home and try it again.  I have a few more things to do to it before I photograph it.  I am thinking I will make a little video showing the process.  Stay tuned!

Tonight we had a chance to go around to all of the different classrooms (they are spread out all over the place so lots of walking)  and see what everyone is working on.  What fun!!!!  I know a few new people I want to take a workshop from...PLUS...I saw a fabulous way to distort and drawing.  Cant wait to try it!  All in all, a very exciting day.

Wednesday, March 31, 2010

IT'S DONE...NO FOOLING!

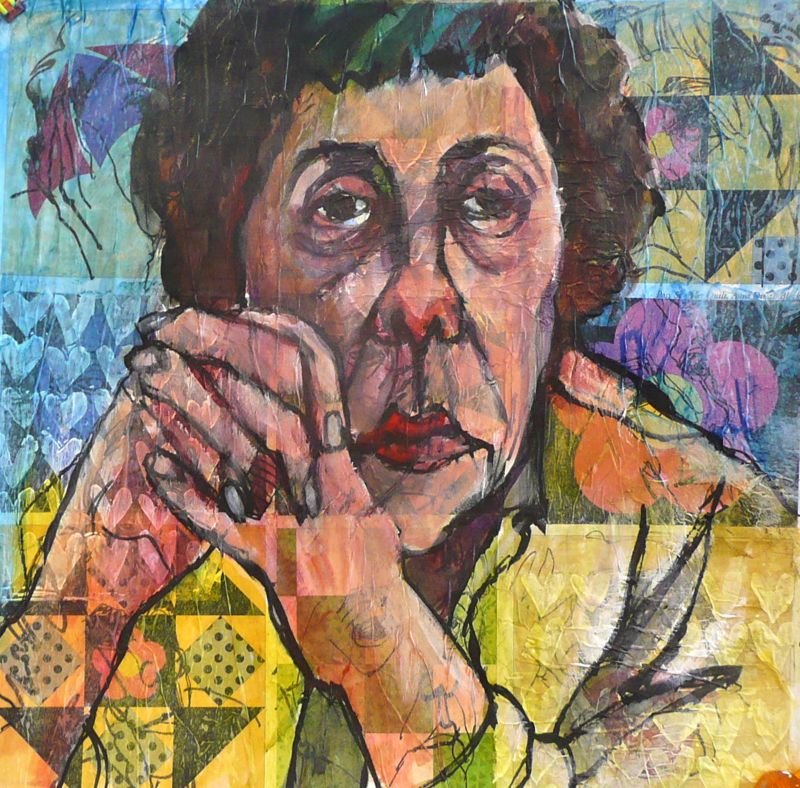
My critique group acts as my expert eyes.  Often, they see something I missed.  Sometimes their opinions are different from mine and I am not swayed.  Either way, I find it very helpful to know what others see and I value the knowledge at expertise from each of them.  Thursday morning we gather to share the week's efforts.  Right now, I feel this piece is finished.  I am happy I managed to keep much of the transparency of the background pieces.  I was particularly delighted where some of the pattern fell on the face in a serendipitous way (beside the eye and crease down from the nostril)


Saturday, March 27, 2010

PUTTING IT ALL TOGETHER!

I realized I had enough of these daily drawings (see "Drawn to the Mirror" blog) to make a background for my next collage self portrait series.  I cut off the calendar information and laid them out, trying to keep the stronger patterns to the outside edges.  I used double stick removable tape to hold them in place.  It makes an interesting image just this way.

 I started to get nervous about proceeding with my idea.  How would it look?  I would hate to ruin all these drawings if my concept turned out "not so much"!  I am usually impatient and rush ahead, but today I decided to try a smaller version (15 x 15) to see the visual effect before I tackled the large (30" x 30") version.  Glad I did!  First off, I realized I needed to spray the papers with acrylic to keep some of the ink from smearing.  Not all of the drawings were done with permanent ink.  I had forgotten that little detail!

I added tissue paper over the top after collaging the drawings down.  I purposely added a some gesso stamped tissue in a few places to see what the effect would be.  It obscures the drawing too much.  I will leave that out of the large version.

 After the collage paper was dry, I drew an image in ink with a stick.  I didn't think the line was strong enough against the background, so I went over it with the wide Copic marker.

 I finished the painting with acrylic used in a transparent way.  I added some white gesso to recapture some lighter values.  These areas become more opaque but you can still see some of the background influences.

  Final evaluation:  Like the overall idea. I need to be a little more careful in my drawing so it doesn't get so "cartoon" like.  I find the heavy dark line a bit too strong.  I think I can tackle the larger painting with confidence now that I have worked out my strategy.

Wednesday, February 24, 2010

SAME TOOL, DIFFERENT SURFACE

When I find a new tool, I like to try it on as many different surfaces as I can think of.  This is Canon Inkjet Photo Paper Plus Glossy ll 13" x 19".  It is the only larger format photo paper that will successfully take watercolor that I know of.    The paper was acting very much like YUPO, lifting back to white.  Photo paper has a coating that YUPO doesn't, so there are some differences.  Don't ask, you will need to discover it for yourself.

I failed to give a credit for the music on my little demo video.  The musician was Tom Rigney and the piece is called "House of the Rising Sun".  Tom often performs locally and is very entertaining!  You can check out his website for more information.  He has lots of cd's to chose from.

Tuesday, February 9, 2010

DO OVER!


I appreciated all the positive comments on this piece but I had to follow what my own internal voice was telling me.  Interestingly, I was listening to a book on tape while I was painting this and it was a very dark, suspenseful story by Daphne Du Maurier called "Jamaica Inn".  I think something of the mood of that story invaded this painting!  I will be more thoughtful in my choice of listening material depending on what mood I want to inject.   Anyway, I decided to scrub off as much of the paint as possible and then collage torn tissue paper over the top.  After that layer dried, I attached a turquoise brush pen to a long stick and redrew the image.  By having the pen extended far out this way, I had less control over the drawing and it made for a looser, more interesting line.  I am hoping to paint it in the same, loose style instead of tight and controlled.  

Last night I had the pleasure of being the guest demonstrator for the Livermore and Pleasanton art societies.  There was a nice crowd and a few familiar faces.  Lots of energy and good questions while I worked.  I need to complete the painting, hopefully tomorrow, and then I will post the results.

Saturday, January 23, 2010

LATEST DEMO FROM SCVWS WORKSHOP


This is the painting I created for the demonstration of an older face in full or 3/4 view.  I like to show different surfaces, so this one has tissue paper collaged onto the surface of watercolor paper with 50/50 mat medium and water.  Let it dry and then draw the image and paint with watercolor.  Oddly enough, tissue paper has a grain.  I must pay attention to that next time so I don't get horizontal wrinkles.  That only happens in real life with a bad face lift!  I think the background could use another wash to even out the color a bit.  Tomorrow everyone will complete their first painting.  I should have a nice slide show to share with you.

Monday, December 8, 2008

LIFE DRAWING SESSION, SECOND SET


Here is the second set of marathon drawings. The way the book comes together, there are 4 pages accordian pleated together, so I treated them as a set and collaged and pre-painted the pages as one continuous page, not knowing how I was going to finish it.

First I collaged some Japanese papers from the book onto the paper, then I used the tissue paper from the previous day with the red acrylic ink on it and collaged that over the pages. Lastly, I mixed 8 parts matt medium with one part Micaceous Iron Oxide (a Golden Acrylic Product) and made a "dirty glaze". Using a plastic palette knife (an old credit card would also work) I spread this onto the pages. I love this "dirty glaze"! I will continue to explore the possibilities. At the drawing session I worked with several ink pens including the Elegant Writer, a wet brush and walnut ink and acrylic white ink.

Sunday, December 7, 2008

DRAWING MARATHON AT MERRITT COLLEGE!


This was one exhausting day, but loads of fun and exciting. This was the first marathon I have done at Merritt College. In fact, I was thinking of Laney College in Oakland all along. Fortunately, I went to Google Maps for directions and saw my misconception. It turns out Merritt College is a stone's throw from where I did the Oakland workshop. I didn't see any signs on the campus where to go so I drove around until I saw people with drawing material. I was a little later than I hoped, so finding a good place to set up was a challenge. A packed room! I wound up at the area where the 20 minute poses were held and that worked out very well for me. I met Dorise, an internet friend, for the first time in person. That was a treat by itself! She introduced me to a few others. Art is such a wonderful way to relate to others with the same passion.

The set up for this marathon was different than any I had been to and I loved it! There were 4 different large platforms throughout the room. One was for the long 3 hour pose, one for 20 minute poses, one for 5-10 min. poses and one for quick poses. The artists were all over the place around the stands. You couldn't switch once you had a place but the models moved around from platform to platform, so you had the opportunity to draw all of them. The best thing for me was how close I was to the models! I am extremely nearsighted and it was great to be able to see hands, feet, facial features so clearly.

I was going to make a slide show but I decided to show 4 at a time so I can describe how I prepared the paper in advance. Each set has the same treatment. I used my one sheet sketch book and it was perfect!!! Just the right amount of pages for the 20 minute poses. Actually, I was usually done in 15 minutes.

These four pages were collaged with some Asian paperback book pages. I'm not sure what exact language it is but I love the graphic look of it. Then I took a sheet of tissue paper and laid it over the pages and brushed some acrylic red ink through the tissue, then lifted the tissue off. I saved it and let it dry and used it on another 4 pages as a collage (tomorrows post) After the ink was dry, I squeezed out a blob of Cheap Joe's Coastal Fog watercolor and brayered it over the pages randomly. I used it straight so it was more like gouache. I drew the image with ink pens, most of which had ink that bled. The coastal fog color rewet and interacted with the ink when I used a wet brush. Overall, I like the effect.

Related Posts with Thumbnails