Thursday, April 12, 2012

A DAY OF SURPRISES!!


My contribution
I am busy getting ready to fly to Kanuga for next week's exciting teaching session.  Murphy's Law went into overdrive and my printer decided to die!   So I spent the day going to Costco, deciding on a printer, bringing it home and then realized I couldn't print from my iPad.  Since I was buying a new printer, that was the one feature I insisted on.  Wireless doesn't mean compatible, it has to say ePrint.  So back to the store to return that one and then to the office supply store which had the printer I thought I wanted.  Got talked out of the Canon in favor of the HP Officejet Pro 8600.  It took the rest of the day to get things set up and working.  So far, so good.  

I was very jazzed to get two copies of American Artist's latest specialty magazine "The Complete Painter's Handbook"  I had been asked to contribute but had no idea exactly what I was contributing to.    I will have fun reading it on the plane on Saturday.  It looks very comprehensive, covering lots of different disciplines.  I was very pleased with how the image I sent came out.  I am never sure what I see on my monitor is what the receiver sees on their monitor.  

I tried out the scanning function on my new printer.  Check out the publication if you see it in the bookstore.

I am going to try to create a few blog posts next week, sharing the Art Camp experience with you.  Let's hope the technology doesn't fail me!

Sunday, April 8, 2012

FINALLY! Slideshow from Potomac Watercolor Workshop

Since Slide.com closed up shop, I was having a difficult time finding a way to make the slide show. I apologize to all the great women who took the workshop and did such great work, for taking so long to put up the show, but you can see that everyone had fun and produced an amazing variety of images. This was the first Variations workshop where everyone did not use the same image. Many used my husband's image which I provided but some used their own. Great results either way. Jerry cut his hair this week so this is an homage to the bohemian that was!

Wednesday, March 28, 2012

WORKSHOP IN DC!

JERRY: SHAPE AND SIZE

JERRY: VALUE,  LINE & TEXTURE
I am in the Washington, DC area teaching my VARIATIONS workshop for the Potomac Watercolor Society.  This is a great group of talented women in the workshop and we are having a wonderful time.    Each day is devoted to a different element of design.  Here are my demos for the element of SHAPE and VALUE.  By a roll of the dice, each participant selects a color combination to work with and a secondary element of design to pair with the element for the day.   I do the same and it makes for lots of unexpected results, lots of laughs and great creativity.

I didn't get to photograph all of the paintings, yet.  I will make a slide show to showcase all the inventive solutions this group is coming up with.  Can't wait to share it all with you.

Tuesday, March 20, 2012

SURPRISE!


I was talking with Jenna from the Madeline Island School of the Arts  on Madeline Island Wisconsin today.  She wanted to post my coffee stirrer drawing video on their website and their Facebook page.  Here are the links below if you want to check it out.  This is going to be an awsome place for me to teach and for the students to have a great art vacation.  While I was looking for the video, I found this little one I had made.  I had totally forgotten about it.  Thought you might like to see it.  Have you made a video of yourself making art?  If not, give it a try.  It is so much fun!
http://www.madelineartschool.com/Classes_detail.cfm?recordno=4&Product_CatalogID=143&ProductNumber=PMW07091312&ProductCode=47&NewPro

http://www.facebook.com/MISAWorkshops

Monday, March 19, 2012

TAMING TAR GEL!

THE CLAN #16 YUPO W/TAR GEL
I have always been frustrated that I couldn't get tar gel acrylic to go exactly where I wanted.  I finally figured out a way to "draw" with it.  Using a rubber funnel I put the tar gel into an empty hair dye bottle that had a small but big enough opening.  It took awhile but I am happy with the results.  YUPO is so smooth the gel flattened out somewhat.  I am going to try it on traditional paper and see if it flattens out as much.  This version of The Clan is very colorful, lots of fun to do.

Sunday, March 18, 2012

SCRATCHING AN ITCH!

THE CLAN #15 on YUPO
This is based on a technique in Mary Todd Beam's book Your Creative Self.  The white part isn't so white but very pastel in the actual painting.  I am getting very frustrated in the poor color reproduction I am getting from my photos.  I can't decide if it is the camera or my lack of skill of the computer program.  So many variables!  Anyway, the basic steps to creating this was using swirling drawing lines, I drew the heads on YUPO using oil pastels in many different colors.  The background is white, not blue! 
THE CLAN #15 STEP ONE

 Then I covered the painting with black gesso and let it dry.  The next part was a bit tricky, trying to find exactly where the images where until I realized that that scraping the gesso was only coming off where the oil pastel was underneath!  I was disappointed that so much of the color came off and only left a tint on the paper.  I then mixed black and white gesso together and added some blue for the background.

So there you have it: TINT/BLACK/TONE

Monday, March 12, 2012

IT'S INTENSE!

THE CLAN #14 ( Hue, Black, Tone)

We have been dealing with one of the most least studied aspect of color: Intensity.  The biggest problem is with the word itself.  I don't know who decided to describe the purity of a color with the word "Intensity" but it's a done deal and we have to live with it.  In English we think of "intensity" as over the top saturation rather than purity, so when you try to explain that a pale tint that is pure in chroma is high intensity, the mind boggles and it feels confusing.  It is important that we are all using the same words to describe things in art, so we are stuck.  And, of course, not all tube colors are pure Hue, mucking up the color waters even more.  It takes awhile to come to grips with the terms and how to integrate the knowledge into successful paintings but that can be part of the fun of this art journey!
Intensity is the biggest element that impacts the mood of your painting, so how can one put that to good use?

There was a world renowned color specialist  in the last century (thought sounds weird!) named Faber-Birren who figured out that any color could be described with one of seven words: 1.HUE (Pure hue - outside edge of the color wheel) 2. WHITE  3. BLACK 4. TINT ( Hue plus White) 5. SHADE (Hue plus Black) 6. GREY (White plus Black) or 7. TONE (Hue plus Black and White or Hue plus Compliment.  All complimentary combinations consist of some part of Red Yellow and Blue.  When all 3 primary colors are present in any ratio, the purity of the color is diminished making it a TONE)

Diagrammed it looks like this:


                                         WHITE


TINT     GREY

                                                     TONE

  HUE BLACK

                                                        SHADE


Draw a large circle around the words HUE     WHITE    BLACK and  a smaller circle around  TINT    TONE   SHADE   GREY.   Now draw a line connecting HUE to TINT,  TINT to WHITE, WHITE to GREY,  etc. and a line from each of the outside words to TONE in the middle.  

If you take THREE of these WORDS that are linked by connecting lines  and create a painting using this Intensity Strategy, you will create a different mood with each different combination.    Here are a few of the possible combinations.    
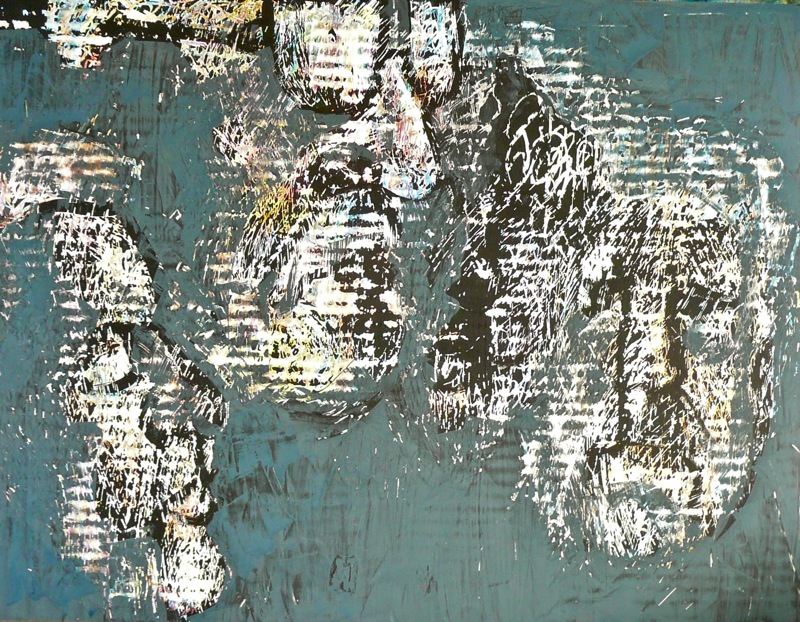
I figured there were 20 different combinations.  I wrote each one on a separate slip of paper, but them in a sack and drew two out for my paintings this past week.   The above painting is HUE, TONE & BLACK.   This is a very challenging but entertaining exercise.  Give it a try!

1.  White - Grey -  Black
2.  Hue -  Tint  - White
3. Hue - Shade - Black
4. Tint - Tone - Shade
5. Tint - Tone - Black
6. Tint - Tone - Grey
7. Shade - Tone - White
8. Hue - White - Black (use primary and secondary colors)
9. Tint - Tone - Shade - Grey (use intermediate hues i.e. red-orange, blue-green etc.)

Related Posts with Thumbnails